HTML From Image: How to Generate Code Using 3 Free Methods
Mike Huddlesman
Meet Mike Huddlesman, the brilliant mind behind CopyRocket AI

Generating HTML code from an image may seem complex, but with the right tools and understanding, it can be quite straightforward. In this guide, we’ll walk you through the process using advanced AI tools such as Copyrocket AI Vision, ChatGPT 4o Models, and Claude AI.
Whether you’re looking to convert an image to an HTML file or incorporate it into your HTML page with CSS code, we’ve got you covered.
You’ll learn how to generate HTML, understand different HTML elements, and even work with image formats like JPG and PNG. We will also discuss how to maintain image quality during the HTML conversion process and ensure your images are properly displayed across different web browsers.
By the end, you’ll be able to take any uploaded image and convert it into clean, efficient HTML code ready for web development, enhancing your web design projects effortlessly.
Checkout our Free AI Tool;
- Free AI Image Generator
- Free AI Text Generator
- Free AI Chat Bot
- 10,000+ ChatGPT, Cluade, Meta AI, Gemini Prompts
Key Takeaways
- Free Image to HTML Generator: Quickly convert images to HTML with drag-and-drop, adjustable settings, and easy preview/edit options. Download or copy the code instantly.
- CopyRocket AI Chat: Upload images, provide a prompt, and generate clean HTML, CSS, and JS code for seamless integration into web projects.
- ChatGPT/Claude/Gemini: Use popular AI chat tools to convert images into HTML and test refined code for high-quality, browser-compatible designs.
- Supports Multiple Formats: All methods work with JPG, PNG, and more, ensuring image quality and consistency.
- Streamlined Workflow: Simplify web development with these tools, making image-to-code conversion fast and efficient.
Method #1 - Using our Free Image to HTML Generator
Generate HTML Code instantly using our free Image to HTML generator tool here which is 100% free to use.
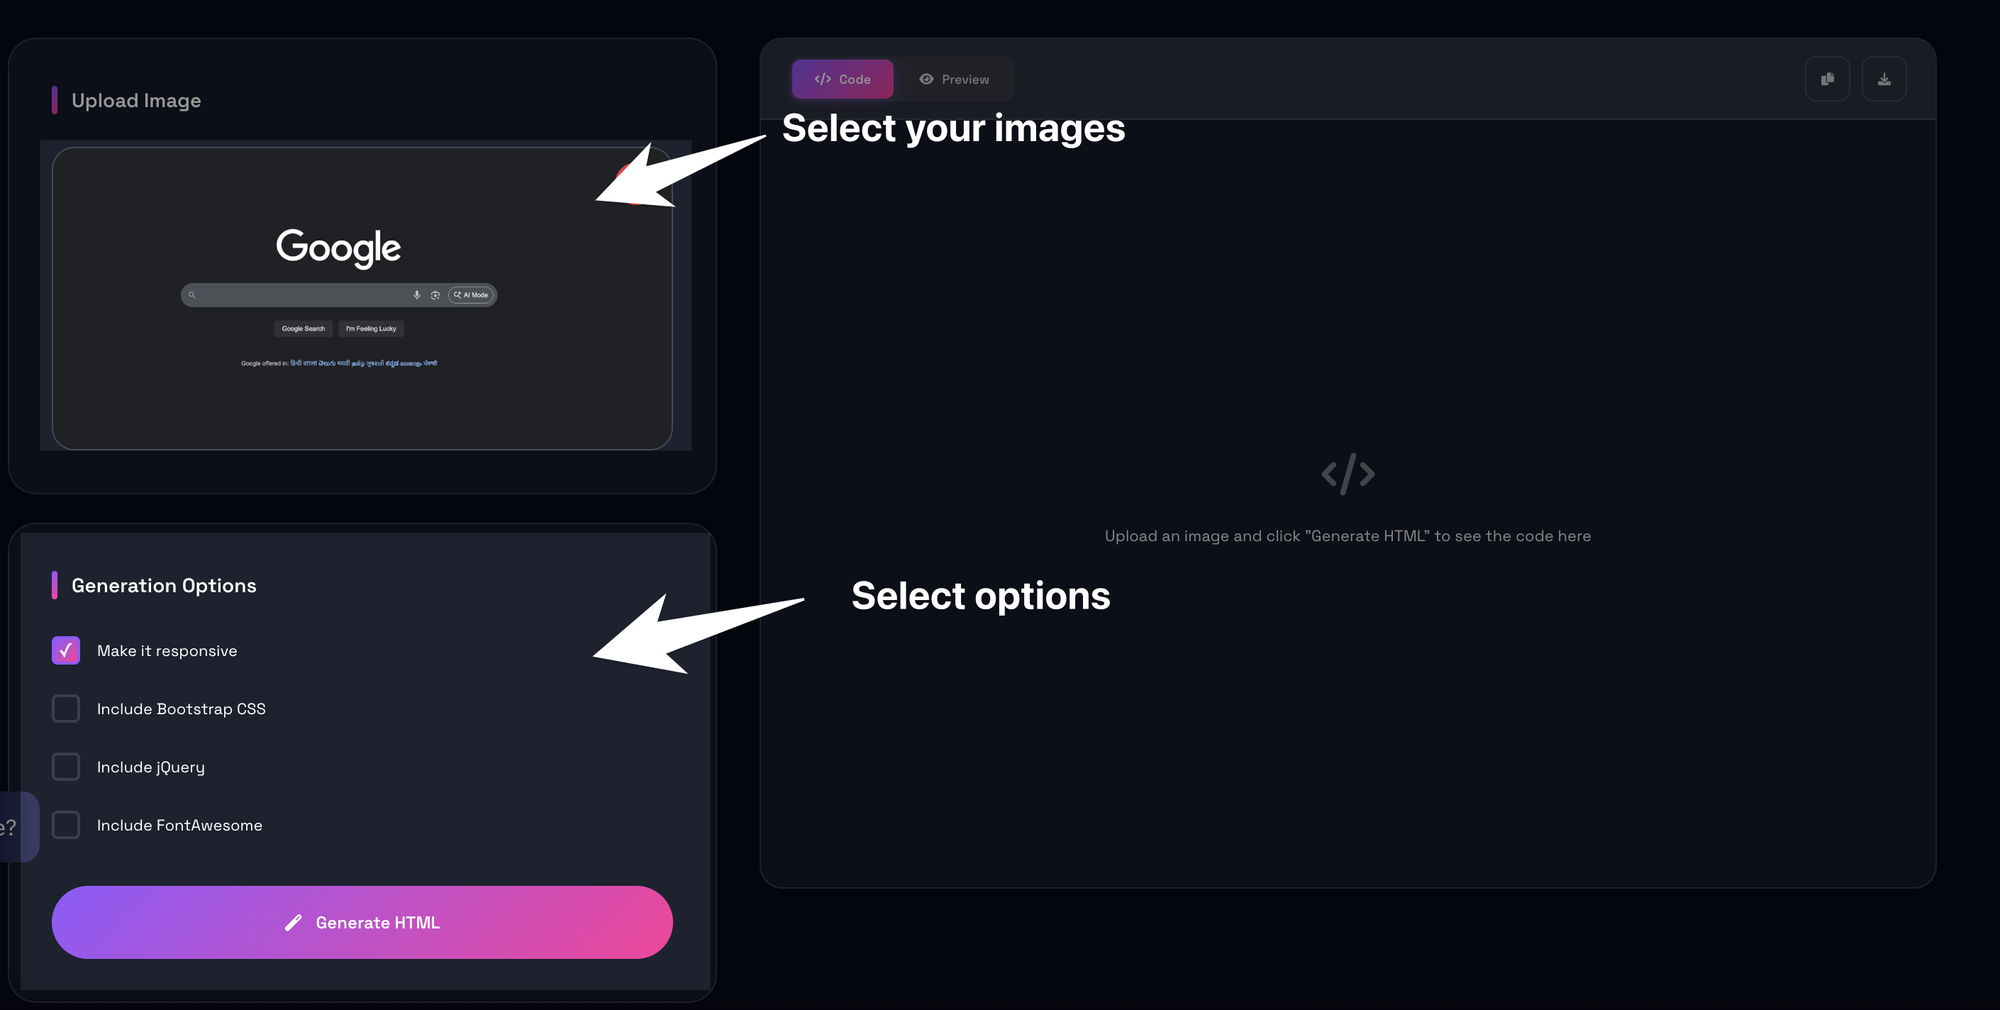
- First Upload or drag or drop the picture to the panel
- Select the following settings i.e. Enable Bootstrap CSS, JQuery, Responsiveness and FontAwesome icons in your html code.
- Then click on generate button and wait for the output on the right side.
- You have code view and preview view. check preview by toggling the preview button in the head.
- You can also edit the code as well and see preview side by side.
- When you're ready click on either copy button or download button to download your code.

Method #2 – Using CopyRocket AI Chat
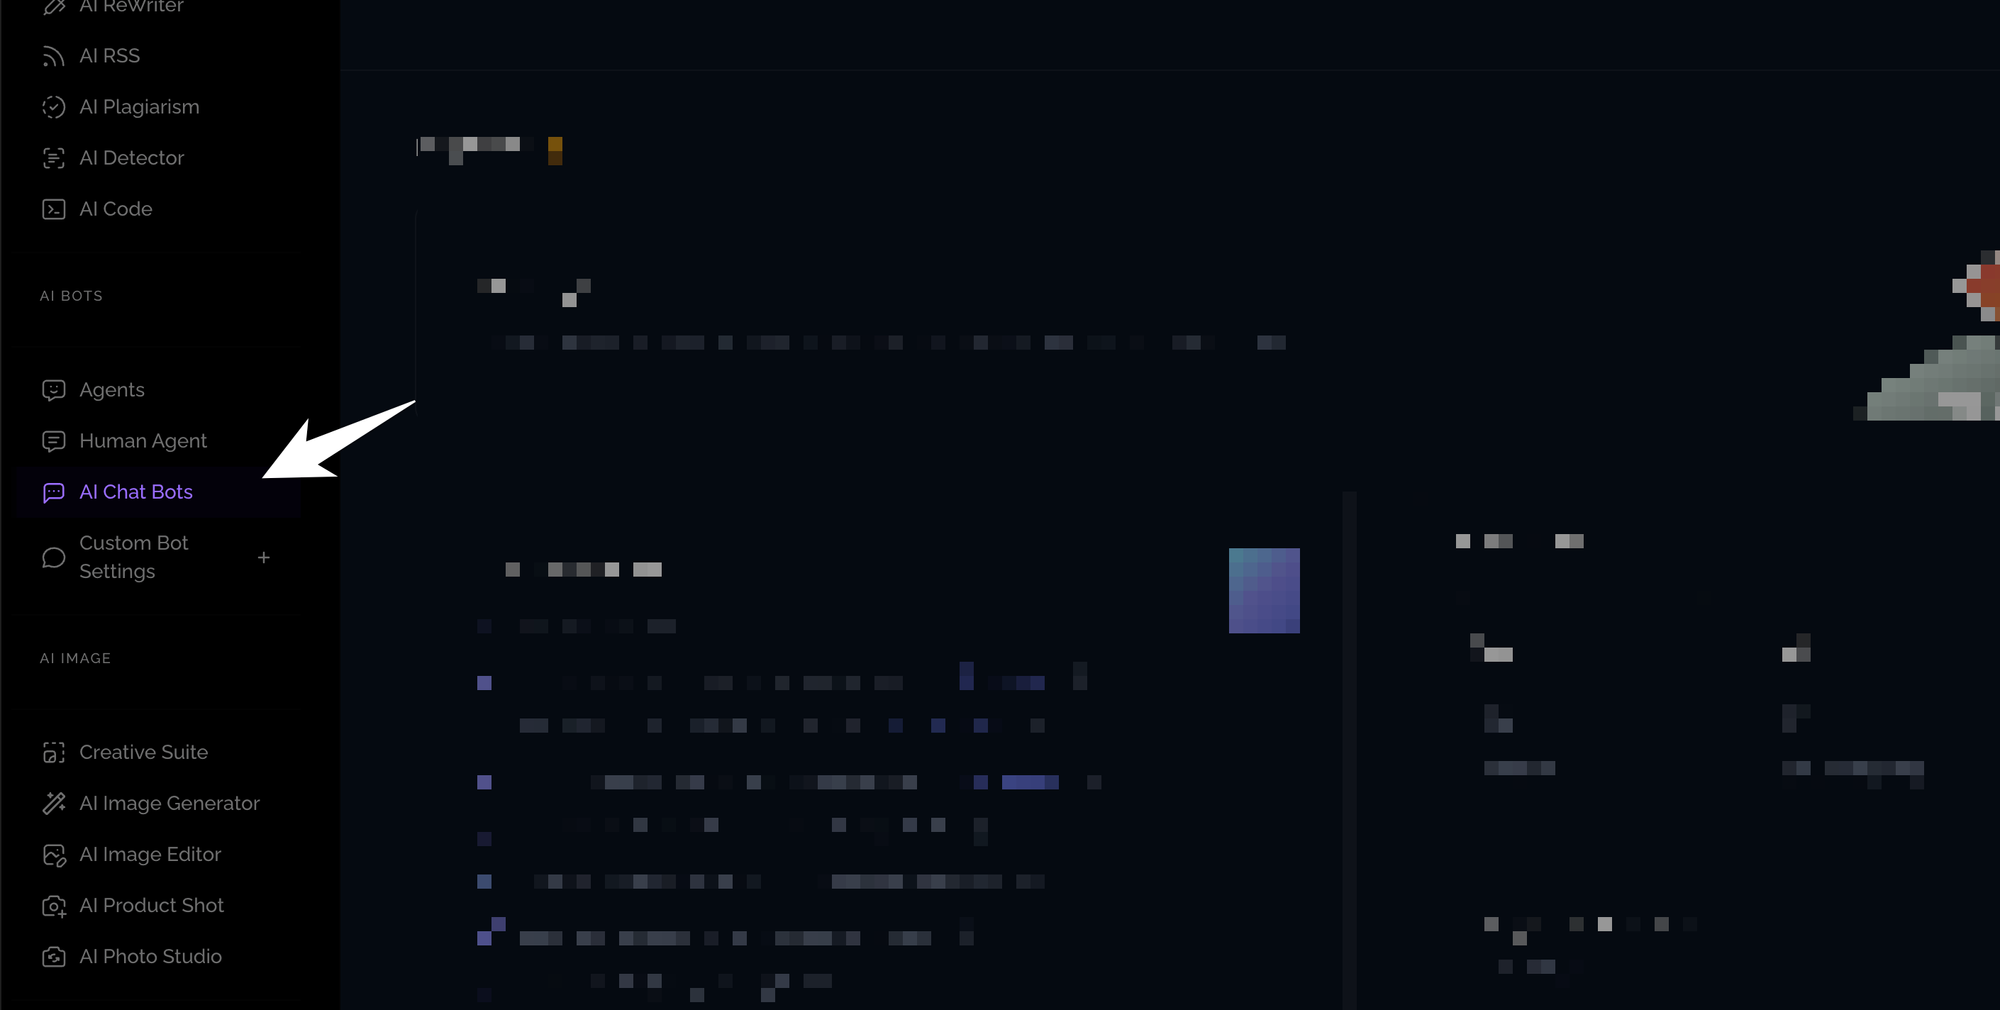
- Login to Copyrocket: Start by logging into your free account at app.copyrocket.ai.
- Navigate to AI Chat: From the left sidebar, find and select AI Chat.
- Create a New Conversation: Initiate a new conversation by clicking on the corresponding option.
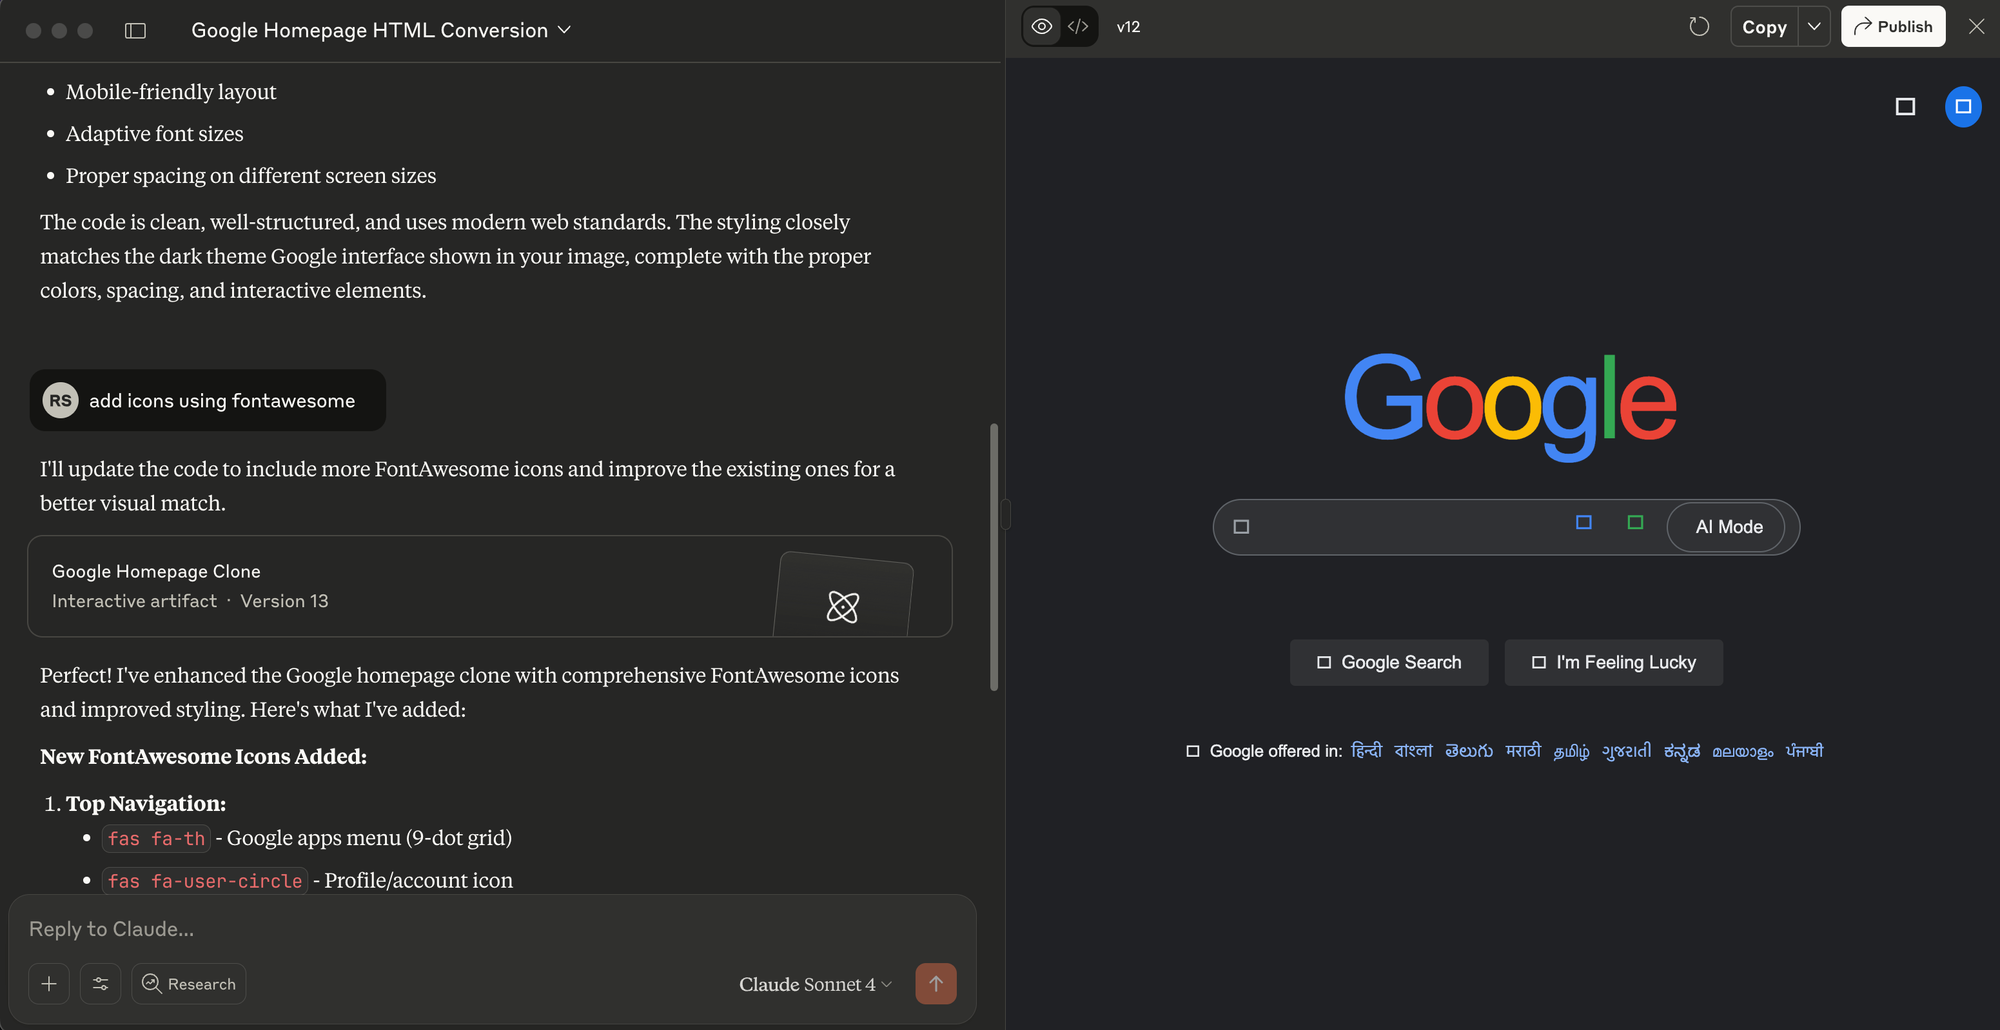
- Upload Your Image: Upload the sample image you want to convert using the plus button on the chat
- Provide the Prompt: In the prompt section, type “transform the image into code in HTML, Bootstrap CSS, JS”.
- Generate the Code: Click the enter or generate icon to proceed.
- Copy and Test the Code: Once the HTML converter completes the process, copy the generated HTML, CSS, and JavaScript code. Paste the code into a suitable environment such as Visual Studio Code for testing.
The generated HTML code will include the src attribute, which specifies the path to the image file, ensuring it loads correctly on your web page.
This method simplifies the task of converting an image to HTML code, making it efficient for web development projects. By understanding how to generate HTML code from an image, you ensure consistent image quality across various web browsers.
Whether you’re working with JPG files or PNG images, maintaining the integrity of your designs during the conversion process is crucial. Utilizing tools like Copyrocket AI Chat streamlines this, allowing you to easily manage uploaded images and their conversion to clean, efficient code.
Method #3 – Using ChatGPT/Claude/Gemini
First You can choose any of the free chatbots available of your choice i.e. ChatGPT, Claude, Gemini and follow the instructions below;
- Login to ChatGPT: Start by logging into your free account at ChatGPT.
- Upload Your Image: Upload the image file you want to convert into HTML format.
- Describe Your Prompt: In the prompt section, provide a detailed description of what you need, similar to the previous methods. For example, “convert image into HTML, Bootstrap CSS, and JavaScript code”.
- Press Enter to Generate: Press Enter to initiate the conversion process.
- View and Copy the Generated Code: You will see the generated code displayed in the interface. Copy the HTML code, CSS code, and JavaScript code provided.
- Test and Refine the Code: Use tools like Codepen.io to paste and test the generated HTML code. Make any necessary refinements to ensure the converted image maintains its quality and fits seamlessly into your web development project. The generated HTML code can be directly incorporated into your HTML page, ensuring seamless integration of images.
Using ChatGPT for this task allows you to efficiently convert an image into clean and functional HTML code along with the necessary CSS and JavaScript code.
This method supports a variety of image formats, such as JPG files and PNG images, ensuring that the HTML document retains the high image quality during the conversion process. Whether you are working with an image map or a background image, ChatGPT provides a straightforward solution for generating HTML code.
This approach is ideal for both single image conversions and batch conversions, aiding in your web design projects with ease.
Additionally, by utilizing this method, you can ensure that your images are correctly formatted and displayed across different web browsers, making the web development process smoother and more efficient.
Frequently Asked Questions (FAQs)
Can I convert images to HTML code with alt attribute using ChatGPT?
Yes, you can easily convert image files to HTML format using ChatGPT. Simply upload your image and provide a detailed prompt, such as “convert image into HTML, Bootstrap CSS, and JavaScript code.” The tool will generate the necessary HTML code, including the src attribute, which specifies the path to the image file for your web development needs.
How can I maintain image quality and image size during HTML conversion?
Maintaining image quality during HTML conversion is crucial. Tools like Copyrocket AI Vision, OpenUI Fly Dev, and ChatGPT ensure that your image retains its high quality throughout the conversion process, whether you’re working with a JPG file or PNG image. For best results, use descriptive alt text, appropriate HTML tags, and the href attribute if you need the image to be clickable.
Which tools can I use to generate HTML code from an image file?
You can use multiple tools such as Copyrocket AI Vision, OpenUI Fly Dev, and ChatGPT to generate HTML code from an image. These tools support various image formats and provide efficient HTML converters that simplify the conversion process, making them ideal for incorporating images into your HTML page, whether for single or batch conversions.
Conclusion
With the wealth of tools available, generating HTML code from an image has never been easier. By using services like Copyrocket AI Vision, OpenUI Fly Dev, and ChatGPT, you can quickly convert images into clean, efficient HTML files.
These powerful HTML converters support an array of image formats, including JPG and PNG images, and allow for both single and batch conversions.
Maintaining image quality during the conversion process is crucial, and these tools help ensure that your images, whether they are background images or detailed Figma designs, are seamlessly integrated into your web projects. Furthermore, using descriptive alt text and appropriate HTML tags can enhance the accessibility and SEO of your web page.
Whether you’re working on a complex web design, integrating an image map, or just need to convert an image into a simple HTML document, these solutions offer a straightforward and efficient approach to web development.
From the initial upload of your image file to the final testing of your generated HTML, CSS, and JavaScript code in Visual Studio Code or another development environment, these tools streamline the entire conversion process, making it easier and faster to deliver high-quality web pages.
Frequently Asked Questions

Written by
Mike Huddlesman
Meet Mike Huddlesman, the brilliant mind behind CopyRocket AI. As the founder of this innovative company, Mike brings a wealth of experience in machine learning, PHP, and Next JS to the table. With h
View all postsYour AI Marketing Agents
Are Ready to Work
Stop spending hours on copywriting. Let AI craft high-converting ads, emails, blog posts & social media content in seconds.
Start Creating for FreeNo credit card required. 50+ AI tools included.
Related Articles
 General
NotebookLM For Coders: Turn Docs Into Faster Code
Code work often fails for a simple reason. You do not have the right context at the right time. You read docs in one tab, skim tickets in another tab, and then...
 General
How to Optimize for AI Search in 2026: The Complete Guide
AI search has shifted from experimental feature to primary search method for millions of users. ChatGPT Search, Google AI Overviews, Perplexity, Claude, and Gem...
 General
Claude Opus 4.6 Review: Here's What New!
Claude Opus 4.6 from Anthropic draws attention because teams want an AI model that writes better code, follows instructions, and stays consistent across long se...