How I Vibe Coded a WordPress Plugin From Scratch
Raman Singh
Raman Singh is a highly skilled marketing professional who serves as the head of marketing at Copyrocket AI

Have you ever had an idea for a WordPress plugin but felt held back by a lack of coding knowledge? What if you could build a fully functional plugin simply by guiding an AI, a process I call "vibe coding"?
It's about setting the right direction and context, then letting the AI handle the heavy lifting of writing the code.
In this post, I'll walk you through how I created a complete AI blog reader plugin for WordPress from the ground up, without writing a single line of manual code.
This plugin transforms your text-based blog posts into audio, offering your visitors a new way to engage with your content.
We'll cover everything from the initial setup and the tools I used to the critical process of context engineering that makes this all possible.
You will see the exact steps I took to develop, customize, and deploy a feature-rich plugin, complete with a settings dashboard and a floating audio player.
Key Takeaways
Creating this plugin involved a structured process focused on providing the AI with the right information. Here are the key steps I followed:
- Context Engineering: I started by creating detailed "context files" that served as the AI's primary source of truth.
- Tool and Model Selection: I chose a powerful AI IDE, a specific AI model, and the necessary API to bring the plugin to life.
- Generating Context Files: I prompted the AI to analyze official documentation for both WordPress plugin development and the ElevenLabs API, creating comprehensive guides for itself.
- Establishing Rules: I configured my AI IDE to consistently reference these context files, ensuring all generated code followed best practices.
- Iterative Development: I guided the AI through building the plugin feature by feature, from the backend settings page to the frontend audio player.
- Testing and Demonstration: I showcased the final, working plugin, including its design customization options and audio playback features.
Tools and Dependencies I Needed
To start vibe coding, you need the right set of tools. This setup ensures the AI has everything it needs to understand your goals and execute them correctly.
AI IDE - Windsurf
I used Windsurf as my AI-powered Integrated Development Environment (IDE). It allows for deep integration with your project files and the ability to set persistent rules for the AI to follow. This is crucial for maintaining consistency and quality throughout the development process. You can achieve similar results with other AI-native IDEs like Cursor.
ElevenLabs API
The core functionality of the AI Blog Reader plugin is converting text to speech. For this, I used the ElevenLabs API. It offers high-quality, natural-sounding AI voices and a straightforward API for generating audio from text, which was perfect for this project.
WordPress Plugin Handbook
To ensure the plugin was built according to official standards, I used the WordPress Plugin Handbook as a primary reference.
This online resource contains all the best practices, security guidelines, and documentation needed to build a robust and secure WordPress plugin.
You can find it here: https://developer.wordpress.org/plugins/.
Which AI Model to Use?
The choice of an AI model is critical. For a complex task like coding, you need a model with strong reasoning capabilities.
I used the GPT-5 High Reasoning model because of its advanced ability to understand context, process detailed instructions, and generate high-quality code. While other models can work, a high-reasoning model reduces errors and the need for constant corrections.
Step #1 - Context Engineering
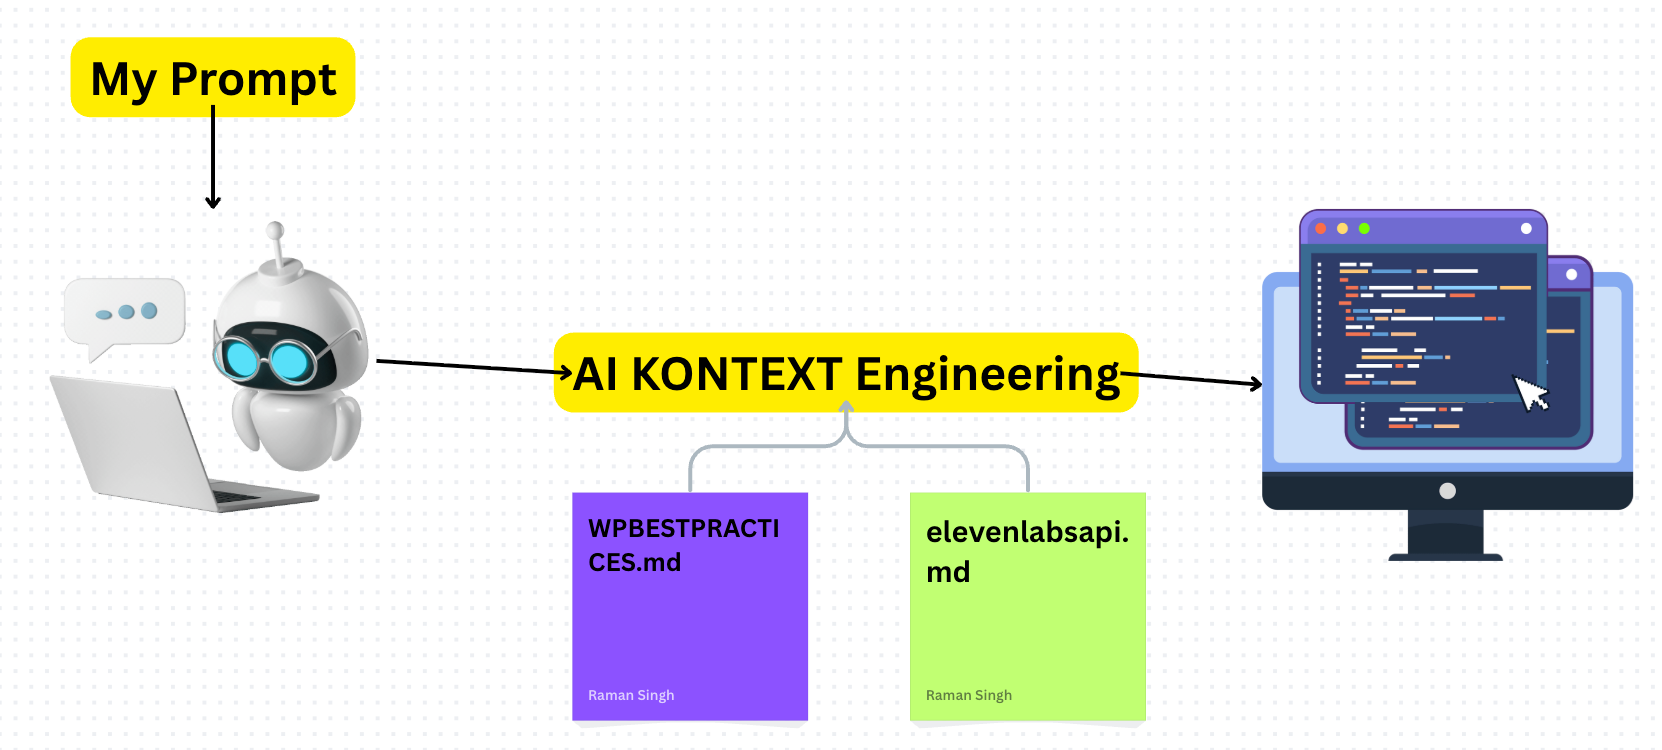
The single most important concept in vibe coding is context engineering. Many users fail when trying to code with AI because they lack this process. They give the AI vague instructions and hope for the best, leading to generic, incorrect, or hallucinated code.
Context engineering is the process of creating a curated set of information that the AI must use as its foundation for development. Instead of letting the AI pull from its vast, generic knowledge base, you provide it with specific, project-relevant documents.
This forces the AI to stay within the "context" you've defined, dramatically improving the quality and accuracy of its output. For this project, it meant the AI would adhere strictly to WordPress best practices and the correct ElevenLabs API implementation.
Step #2 - Generate WordPress Plugin Context File
My first step in context engineering was to create a file detailing WordPress plugin development best practices. I didn't write this myself. I prompted the AI to do it for me.
I instructed the AI to analyze the official WordPress Plugin Handbook URL. The prompt was something like this:
"Analyze this URL: https://developer.wordpress.org/plugins/. Extract all the essential content and create a comprehensive 'best practices' document. Include everything needed to build a custom WordPress plugin, from initial steps to advanced security practices. Save this information in a file named wpbestpractices.md in the root folder."The AI then processed the handbook and generated a detailed markdown file. This file became the AI's guide for anything related to WordPress development, ensuring it followed proper hooks, security measures, and coding standards.
Step #3 - Generate ElevenLabs API Context File
Next, I repeated the process for the ElevenLabs API. The plugin needed to send text to the API, handle the audio response, and manage voice selection. I gave the AI the URL to the ElevenLabs API documentation and a prompt like this:
"Do the same for the ElevenLabs API documentation at this URL [Reference URL to ElevenLabs Docs]. Create a document that details how to integrate the API specifically for a WordPress plugin. Document the process for sending text, fetching audio, and selecting voices. Name the file elevenlabsapi.md and save it in the root folder."This created a second context file. Now, the AI had two definitive sources of truth: one for WordPress and one for the text-to-speech service.
Step #4 - Add Windsurf Rule
With my context files ready, I needed to ensure the AI used them. In Windsurf, you can set "rules" that the AI must follow for a specific project (a workspace rule).
I created a new rule with the following instructions:
"You are an expert WordPress plugin developer. Before responding to any prompt, you must always read and adhere to the guidelines in thewpbestpractices.mdandelevenlabsapi.mdfiles. You also need to maintain a timeline of your work inprogress.md.After every successfull implementation add to memory as well.
- Dont add global CSS rules which is always there by the current theme
- Always add prefix to every css rule like "aireader" to not contradict with any other css rules of the wordpress theme user using."
This rule is the key to successful vibe coding. It forces the AI to consult the context files with every prompt, preventing it from deviating or generating superficial code. The progress.md file helps the AI keep track of what it has already built, which is useful for larger, multi-day projects.
Step #5 - Start WP Plugin Development
Now for the fun part. With the context and rules in place, I could start building the plugin by giving the AI high-level instructions. My initial prompt looked something like this:
"Code Wordpress Plugin "AI Blog Reader" to that takes the content of the current blog page and play the the voice reader using elevenlabs API. Follow and read wpbestpractices.md, elevenlabsapi.md file how you can integrate it.
Here are the features i want
Build dashboard dedicated menu with menu "AI Reader" with settings sub menu that has Elevenlabs API field, Select voice from library field with sample voice overview (generate using api, sample - hello, this is me {name}, let me read the blogs for your users).
Add Design submenu, where user can select the color of the audio player, controls, placement (above content, below content or floating menu item).
for floating audio player, when user click on play icon, it shows 100% width in footer, and for above and below player - it shows same 100% width in footer when player is not in focus when user scroll down or up.
Player can be customizable in design, the colors, controls, logo if they want to add.
How to process Audio
When user selects or press play button, send text of the blog content to API and get the audio and start playing it. dont auto-send, only send when required.
Audio controls
Logo Option (if selected) 1:1 icon.
Speed x1, x2 etc.
repeat, forward 10s rewind 10s
play stop.
download audio button.
Styling Instructions
Dont add global CSS rules which is always there by the current theme
Always add prefix to every css rule like "aireader" to not contradict with any other css rules of the wordpress theme user using.
Because of the context engineering, I didn't have to specify every technical detail. The AI used the markdown files to figure out how to create a settings page, use the WordPress HTTP API, enqueue scripts, and interact with the ElevenLabs API correctly.
Step #6 - Demo Output

After several hours of iterative prompting and refinement, the plugin was complete. The final output was a fully functional AI Blog Reader.
- Frontend Player: An audio player appears above the content of each post, featuring play/pause, rewind, speed control, and a download button.
- Floating Player: As the user scrolls, a mini-player sticks to the bottom of the screen, ensuring the audio controls are always accessible.
- Settings Dashboard: In the WordPress admin area, a new "AI Reader" settings page allows the administrator to:
- Enter their ElevenLabs API key.
- Choose from different ElevenLabs models (e.g., Multilingual, Turbo).
- Select a default voice from a list fetched directly from the API.
- Customize the player's position (above or below content) and color scheme.
- Enable or disable specific player controls.
How Much Did It Cost Me?
Building this plugin from scratch was not free, but it was incredibly cost-effective. The entire development process, including some trial and error, consumed about 60 credits in my AI IDE.
Considering the time and effort it would take to code this manually, especially for someone who isn't a professional developer, this is a small price to pay for a custom, fully functional application.
Best Practices to Vibe Code Your Next WP Plugin
If you want to try vibe coding yourself, here are some best practices to follow:
- Invest in Context Engineering: Do not skip this step. The quality of your context files will directly determine the quality of the final product. Use official documentation as your source.
- Use a High-Reasoning AI Model: Cheaper, faster models are more likely to make mistakes. For coding, a powerful model is worth the extra cost.
- Be Specific in Your Prompts: While context engineering handles the "how," your prompts should clearly define the "what." Describe the features you want in detail.
- Iterate in Small Steps: Don't try to build the entire plugin with one massive prompt. Build it feature by feature. For example, start with the settings page, then build the audio player, then add the floating player. This makes debugging much easier.
- Create a Progress File: For any project that takes more than an hour, use a
progress.mdfile. Instruct the AI to update it with what it has completed. This gives the AI memory and helps it understand the current state of the project.
Final Thoughts
Vibe coding represents a significant shift in how we can create software. It lowers the barrier to entry, allowing creative individuals to bring their ideas to life without needing to become expert programmers. By focusing on high-level direction and solid context, you can guide an AI to build complex applications efficiently and effectively.
The AI Blog Reader plugin is a perfect example of this. In just a few hours and with minimal cost, I developed a marketable, feature-rich tool. You can use these same instructions and prompts to build it yourself or apply this methodology to your own unique plugin ideas.

Written by
Raman Singh
Raman Singh is a highly skilled marketing professional who serves as the head of marketing at Copyrocket AI. With years of experience in the field, Raman has developed a deep understanding of all asp
View all postsYour AI Marketing Agents
Are Ready to Work
Stop spending hours on copywriting. Let AI craft high-converting ads, emails, blog posts & social media content in seconds.
Start Creating for FreeNo credit card required. 50+ AI tools included.