How to use AI in Photoshop (Generative Fill) - Ultimate Guide

Mike Huddlesman
Meet Mike Huddlesman, the brilliant mind behind CopyRocket AI
For over three decades, Adobe Photoshop has dominated the realm of image editing, becoming an indispensable tool for professionals and enthusiasts alike. With the advent of artificial intelligence, Photoshop has embraced an exciting frontier with the introduction of Photoshop AI generative fill in early 2023.
This powerful feature not only revolutionizes the way we interact with images but opens up a playground of creative possibilities.
Whether you’re looking to remove unwanted elements, stretch the boundaries of your canvas, or craft perfect backgrounds with ease, generative fill taps into the potential of AI to simplify these tasks.
In this guide, we’ll explore the nuances of how to use AI in Photoshop, focusing on the innovative generative expand, the plethora of generative AI features, and offering practical tips to leverage this technology to its fullest.
From navigating the Photoshop beta app to mastering the generative fill tool, and understanding the synergy between AI photo editing and Adobe Sensei, we’re here to dive deep into making the most out of your Photoshop AI experience.
Join us as we uncover the synergy of creativity and technology, transforming how we approach photo editing in the Adobe Creative Cloud era.
Checkout our Free AI Tool;
What is Generative Fill in Photoshop
Generative Fill in Photoshop leverages the power of artificial intelligence to redefine image editing. At its core, generative fill allows users to fill, edit, and seamlessly remove elements within an image.
This feature harnesses the capabilities of machine learning to fabricate parts of images, or even create entire scenes, which mimic the original image’s lighting, perspective, and texture with astonishing precision.
Users can effortlessly generate realistic art pieces, as Photoshop takes every pixel into consideration, ensuring the newly added or removed elements blend in flawlessly.
Why Generative Fill is a Game Changer
The introduction of generative fill in Adobe Photoshop has significantly expedited the process of photo editing. Tasks that previously required meticulous manual labor, like clone stamping for element removal or insertion, can now be accomplished with far fewer clicks and much less time.
By automating steps such as shadow casting, reflection addition, lighting adjustment, and perspective matching, Adobe’s generative fill simplifies the editing process while elevating the final product to professional standards.
This AI-driven feature not only speeds up content creation but also stands to replace costly stock image subscriptions thanks to its ability to generate photo-realistic images indistinguishable from professional stock photos.
Expanding Creative Horizons
Photoshop’s generative fill should be seen as more than just an editing tool; it’s a springboard for creativity. It enables artists and designers to rapidly materialize their visions, whether by adding new elements to a scene, altering existing ones, or conceiving entirely new compositions from scratch.
From turning a mundane photo into a masterpiece to designing complex visuals for graphic design projects, generative fill accommodates a vast range of creative needs.
Additionally, it simplifies tasks like object removal, making it easy to declutter scenes or remove undesired elements, thus ensuring that the focus is solely on the intended subject.
Harnessing Generative Fill
To utilize this innovative AI feature in your projects, open an existing image or create a new one in Adobe Photoshop. Navigate to the Edit menu, where you’ll find the generative fill option. With a simple click on the generative fill button, you can begin transforming your images.
The tool integrates seamlessly with Adobe’s extensive suite, including Adobe Express and Adobe Illustrator, and enhances the functionality of tools such as the crop tool, select subject, and object selection features.
Plus, every action performed with generative fill is non-destructive, meaning each alteration is stored in a separate layer, allowing for easy modifications or reversals.
In essence, Adobe Photoshop’s generative fill marries the creativity of human artists with the precision of AI, opening a new chapter in digital art and photo editing within the Adobe Creative Cloud ecosystem.
Whether you’re refining images in Camera Raw, exploring neural filters, or experimenting with new visual concepts, generative fill equips you with the tools to achieve unparalleled creativity and efficiency in your workflow.
How to Use AI (Generative Fill) in Photoshop
In the following section, we will explore various ways to harness the power of AI (Generative Fill) in Photoshop, including correcting imperfections, automating background generation, creating unique compositions, and enhancing photo realism for breathtaking visual content.
Select Or Create your Picture from Scratch
Step 1: Create Your Canvas
Start by creating a new canvas in Adobe Photoshop. This can be done by opening the software and selecting “File” > “New.” Choose the parameters that best suit your project, whether you’re working on graphic design, photo editing, or an entirely original composition.
This is your creative playground, so feel free to experiment with different sizes and resolutions.
Step 2: Invoke the Generative Fill Feature
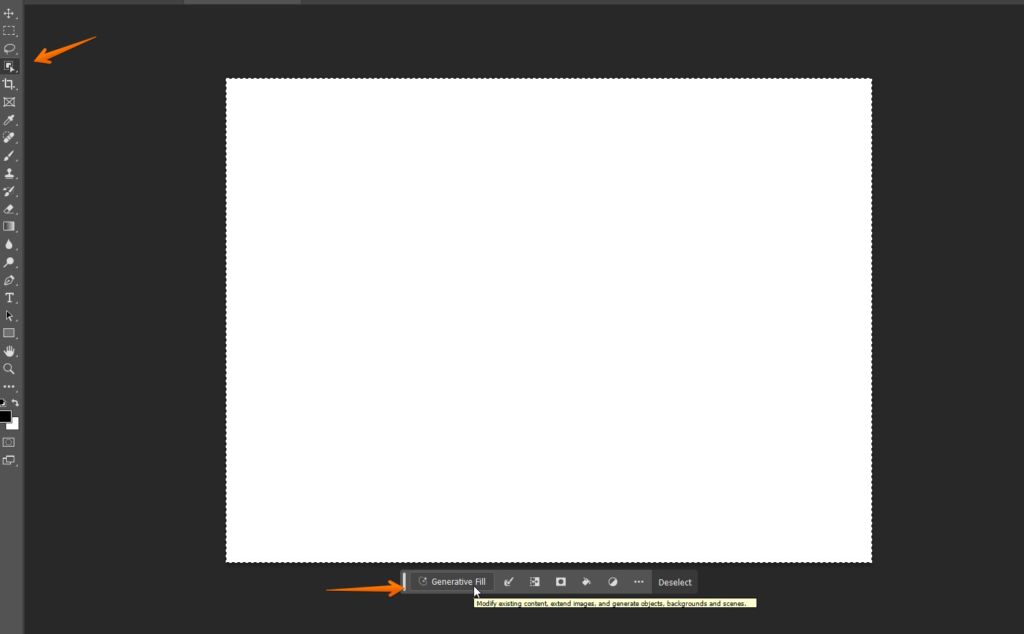
With your canvas ready, select the area where you wish to apply the generative fill. You can use the rectangular marquee tool for a more precise selection or simply click on the area if specificity isn’t required.
Then, click on the generative fill button, located under the “Edit” menu. This step leverages Adobe Photoshop’s integrated AI tools to enhance your image editing process.
Step 3: Enter Your Creative Prompt
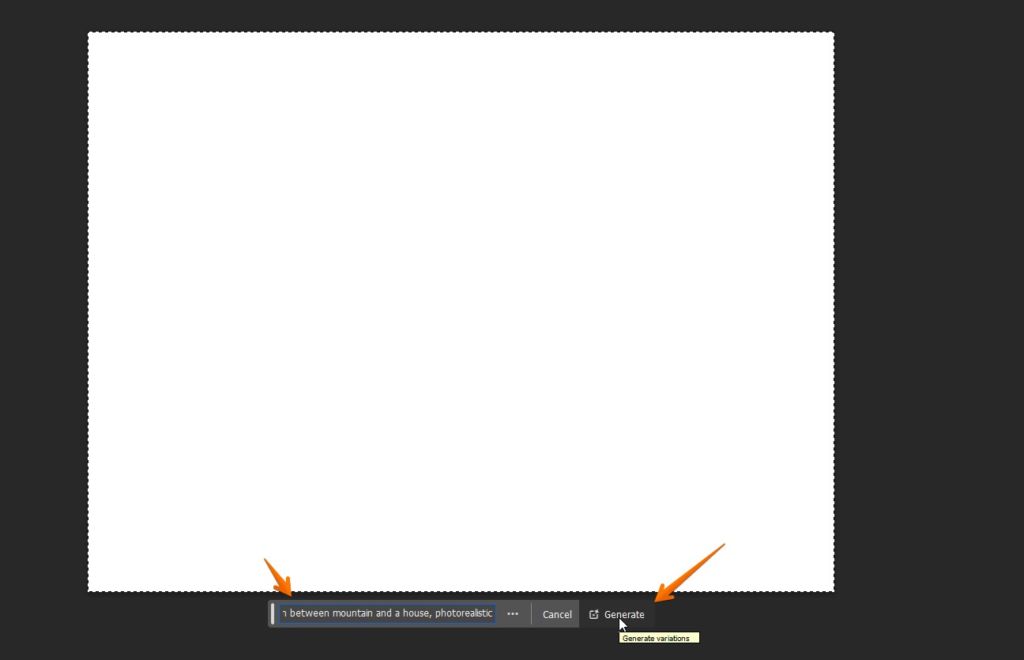
Once you’ve clicked on the generative fill option, a dialog box will appear, prompting you to enter specific instructions for the AI.
This is where you can get creative with your requests. For instance, if you’re working on photo editing and need to fill in a blank sky, you might enter “sunset clouds.” The AI generative fill, powered by Adobe Sensei, will interpret your instructions to best suit your project’s needs.
Step 4: Generate and Select Variations
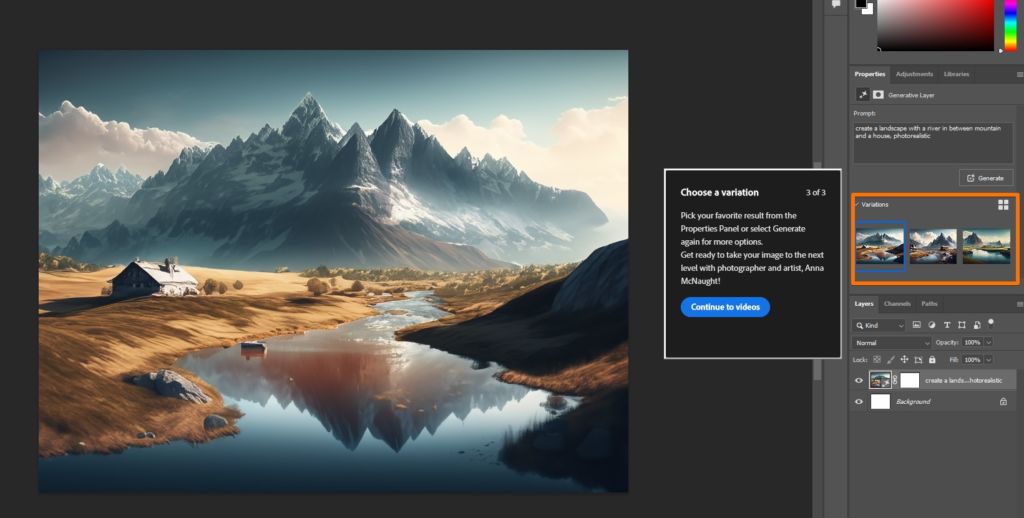
After entering your prompt, click on the “Generate” button. Photoshop AI generative fill will process your request and present you with various options on the right sidebar, above the layer panel.
These variations offer different interpretations of your prompt, allowing you to choose the one that best fits your vision. Select your preferred option, and it will be applied to your selected area, seamlessly integrating with your overall composition.
Expand or Extend the Image
Step 1: Begin With the Crop Tool

To utilize the generative fill for image expansion, start by selecting the crop tool from the Photoshop toolbar. This tool is essential for adjusting the canvas size and is the first step in preparing your image for extension.
Step 2: Adjust Image Dimensions

With the crop tool active, click and drag the edges of the image canvas to create the desired amount of space on either side of your image. This step is particularly useful when you need to adjust the dimensions of your image for specific requirements—be it for graphic design projects, social media content, or even web development tasks.
Step 3: Apply Changes
Once you’re satisfied with the new dimensions, finalize your adjustment by clicking the checkmark located in the toolbar at the top of the Photoshop window. This action commits to the changes you’ve made, setting the stage for the next step.
Step 4: Use Generative Fill to Extend the Image
Now, it’s time to bring in the magic of Photoshop’s AI capabilities. Navigate to the “Edit” menu and select the generative fill option. Here, Photoshop AI, powered by Adobe Sensei, kicks in to intelligently fill the expanded areas of your canvas, ensuring a seamless extension of your original image.
Step 5: Customize With Generative Variations
After activating the generative fill, you’ll be prompted to choose from different AI-generated variations. These options are found in the generative layer properties, allowing you to pick the one that best matches your vision. Select the variation you prefer, and Photoshop will automatically apply it to the expanded areas.
Step 6: Fine-tuning Your Image
If the initial results aren’t exactly what you were looking for, don’t worry. The “Click Generate” feature allows you to produce new variations. You can repeat this process as often as necessary until you achieve the desired outcome. Remember, every action you perform with the generative fill is non-destructive, so your original image remains untouched and safe.
Step 7: Managing File Size
During the process, you might generate multiple variations before settling on the final choice. To manage your project’s file size effectively, feel free to delete any unused variations from the generative layer. This step ensures that your Photoshop project remains organized and efficient, aligning with best practices in image editing and AI photo editing workflows.
Change Face Expressions
Photoshop has always been at the forefront of photo editing, and with the introduction of AI features like generative fill, tweaking and transforming face expressions has never been easier. Here’s how to do it:
Step 1: Select the Lasso Tool
Start by picking the lasso tool from the toolbox. This tool allows for free-form or precisely edged selections. It’s perfect for isolating the facial area you wish to modify.
Step 2: Select the Face

Using the lasso tool, carefully draw around the face you intend to alter. Ensure your selection captures the entire facial area, as this defines the workspace for the AI to perform its magic.
Step 3: Enter Your Prompt in Generative Fill
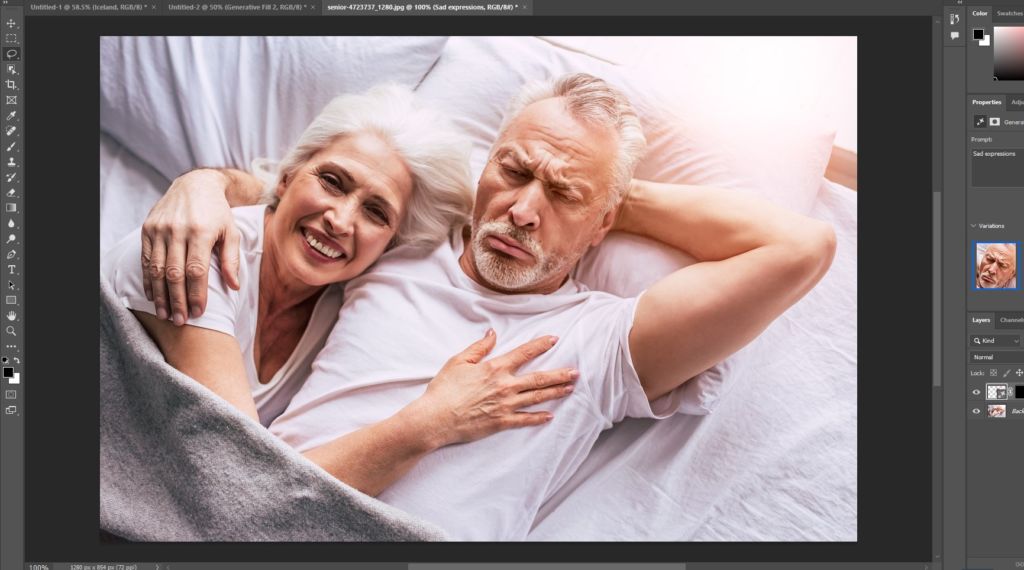
Once the face is selected, go to the “Edit” menu and click on “Generative Fill.” A dialogue box will appear, prompting you to describe the new facial expression you’re aiming for. This could range from “smiling” to “surprised.” Be specific to get the best results. This step unleashes the power of Adobe Sensei, Adobe Photoshop’s AI, to interpret your request.
Step 4: Review Variations and Select the Most Suitable
After you click generate, the AI will offer a series of variations within the generative layer. These are different AI interpretations of your prompt. Review these options and select the one that best fits your vision for the face change. This flexibility is a hallmark of Photoshop’s AI generative fill, providing numerous creative possibilities.
Remove Specific Object
Removing unwanted objects from your photos is now more intuitive and efficient, thanks to Adobe Photoshop’s AI capabilities. Follow these steps to effortlessly erase objects using the generative fill feature, tapping into the power of generative AI for cleaner, more professional image editing.
Step 1: Select the Lasso Tool
Begin by selecting the lasso tool from the toolbox. This versatile tool is ideal for free-hand selection around the object you wish to remove from your image. The precise control ensures that only the unwanted element is targeted for removal.
Step 2: Select the Object
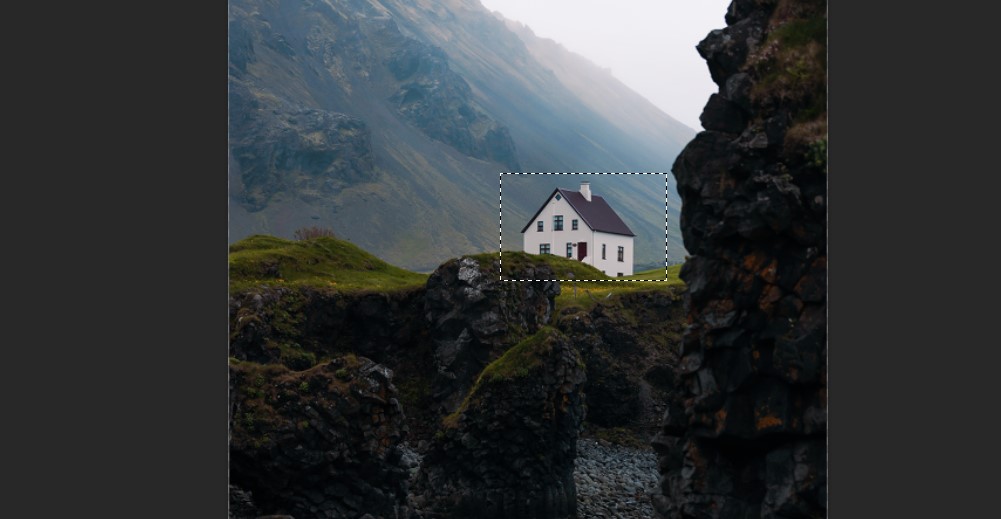
With the lasso tool active, carefully encircle the object you’re aiming to remove. A close yet comfortable margin around the object will provide Adobe Sensei, the intelligence behind Photoshop’s AI features, with a clear area to work its magic.
Step 3: Enter Your Prompt in Generative Fill
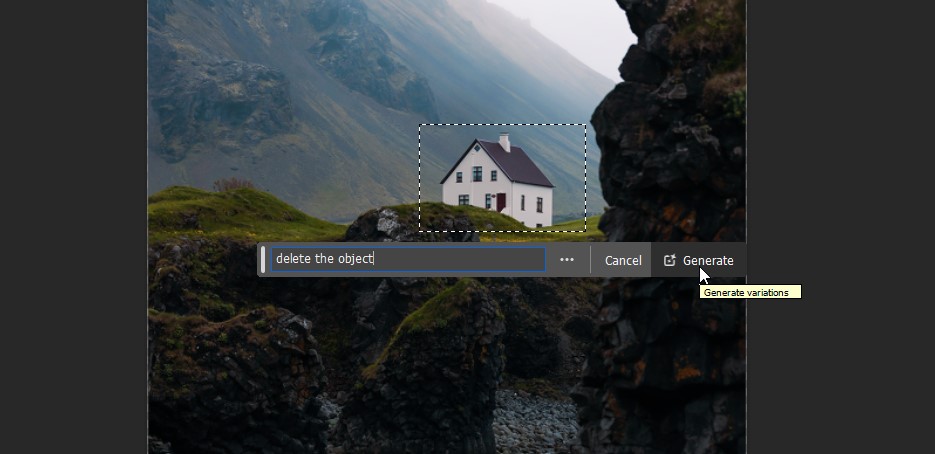
Once your selection is made, go to the “Edit” menu and select “Generative Fill.” In the dialogue box that appears, you can specify your intent simply by typing “remove this object.” The generative fill tool, powered by Adobe Sensei, will interpret your command, setting the stage for a seamless edit.
Step 4: Review Variations and Select the Most Suitable
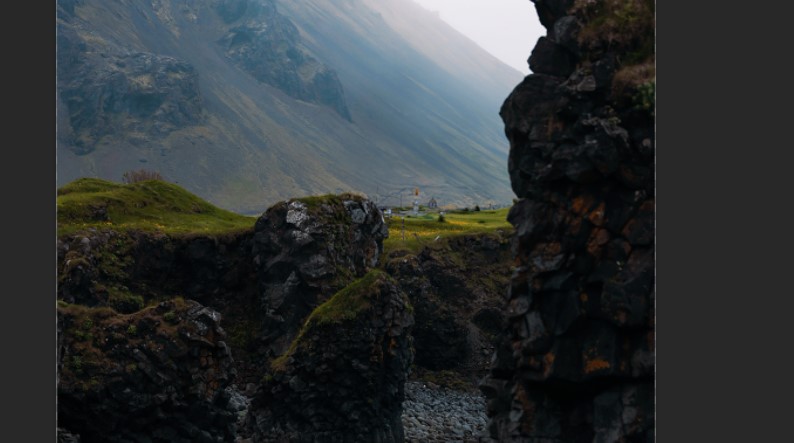
After initiating the command with the “Click Generate” button, Photoshop presents various AI-generated options for filling the space left by the removed object. These options, appearing in the generative layer, showcase Adobe Photoshop AI’s capability to understand and adapt to the context of your existing image. Examine these variations and choose the one that best integrates with your photo’s overall aesthetics.
Change Subject Background
Changing the background of an image to place your subject in a different setting, like a cozy café, has been simplified with Photoshop’s AI features, specifically through the use of generative fill. Here’s how to accomplish this with a step-by-step guide that taps into the power of artificial intelligence for photo editing.
Step 1: Select the Lasso Tool
Kickstart the process by choosing the lasso tool from Photoshop’s array of tools. This selection tool is crucial for accurately defining the area around the subject you wish to isolate from the current background. Its precision is key in preparing for a smooth background change.
Step 2: Select the Object

With the lasso tool active, meticulously outline the subject in your image. This step is essential, as it signals to the AI exactly which part of the image you’re focusing on changing. The object selection process ensures that your subject is clearly defined against any background you choose to insert.
Step 3: Enter Your Prompt in Generative Fill

After delineating your subject, head over to the “Edit” menu and choose “Generative Fill.” Within the dialogue box that pops up, type in your prompt, like “change background to sitting in café.” This instruction utilizes the generative AI features of Adobe Photoshop AI, specifically leveraging Adobe Sensei’s capabilities to understand and execute your creative vision.
Step 4: Review Variations and Select the Most Suitable

Upon clicking the generative fill button, Photoshop generates several variations of your prompt using its generative AI technology. These alternatives are presented in the generative layer, showcasing different interpretations of a café setting as the new backdrop for your subject. Peruse these options and select the one that seamlessly complements your image, achieving a natural and cohesive look.
Modify Object Clothing
Changing the appearance of clothing in a photograph, say swapping a plain hat with a more whimsical bunny hat, demonstrates the innovative capabilities of generative fill powered by Photoshop’s AI. This process, utilizing Adobe Photoshop’s AI tools, showcases how artificial intelligence can elevate photo editing to new levels of creativity and precision. Here’s a straightforward guide to achieving this transformation:
Step 1: Select the Lasso Tool
Begin by launching Adobe Photoshop and open your image. From the toolbox, choose the lasso tool, an essential element for free-form selection. This tool is crucial for accurately isolating the clothing item (in this case, the hat) you wish to modify, ensuring a clean and precise working area for the AI to interpret.
Step 2: Select the Object

With the lasso tool active, carefully trace around the hat you’re aiming to change. This object selection step is vital as it informs the AI precisely what you’re planning to alter. Ensure the selection closely surrounds the hat to provide clear instructions to the AI about the modification scope.
Step 3: Enter Your Prompt in Generative Fill

After making your selection, proceed to the “Edit” menu and select “Generative Fill.” In the dialog box that appears, input a detailed prompt such as “transform this hat into a bunny hat.” This is where you leverage generative AI features, specifically Adobe Sensei, to interpret and execute your creative request through the use of generative fill technology.
Step 4: Review Variations and Select the Most Suitable
Once you’ve clicked the “Generate Fill” button, Adobe Photoshop’s AI will present various interpretations of your request. These are displayed within the generative layer, offering different takes on how a bunny hat might look on your subject.
This range of options is a testament to the AI photo editing capabilities of Adobe’s generative AI technology. Browse through these variations, utilizing the generative fill feature to choose the one that best aligns with your envisioned outcome, seamlessly blending AI innovation with your creative intent.
Add Accessories to the Object
Adding accessories to a subject in a photograph, such as adorning a man’s hand with a gold chain, exemplifies the power of Photoshop AI and its generative AI capabilities. This enhancement can be achieved through a series of steps that leverage the generative fill feature, showcasing the seamless integration of AI in photo editing workflows. Follow this guide to enrich your images with new details:
Step 1: Select the Lasso Tool
Initiate the process by selecting the lasso tool from the toolbox in Adobe Photoshop. This tool is essential for making free-form selections around the object that you wish to accessorize. Its precision is instrumental in ensuring that the added accessory will blend naturally with the existing image.
Step 2: Select the Object

With the lasso tool active, carefully draw around the area where you want to add the accessory, such as a man’s hand for the gold chain. This precise object selection is necessary to inform the AI exactly where to integrate the new accessory, ensuring a realistic and cohesive result.
Step 3: Enter Your Prompt in Generative Fill

Navigate to the “Edit” menu and select “Generative Fill.” In the dialogue box that materializes, enter a specific prompt like “add a gold chain to this hand.” This command harnesses the AI photo editing and generative AI features of Adobe Photoshop, engaging Adobe Sensei to interpret and act upon your creative directive.
Step 4: Review Variations and Select the Most Suitable
After activating the “Click Generate” button, Adobe Photoshop AI works its magic, presenting various AI-generated options for how the gold chain could look on the subject’s hand. These options emerge in the generative layer, illustrating the versatility and adaptability of the generative fill tool and Photoshop AI’s generative fill capabilities. Examine these variations and choose the one that best suits the image, effectively employing the generative fill feature to enhance your photo editing prowess.
Modify Body Style
Modifying a subject’s hair color in a photograph to black showcases the intersecting realms of AI photo editing capabilities and graphic design within Adobe Photoshop. Engaging the power of Photoshop AI, especially its generative AI features, allows for stunning, realistic transformations that can be achieved with a few simple steps. Here’s how you can use this cutting-edge technology to change a man’s hair to black:
Step 1: Select the Lasso Tool
Kick off the process by opening your existing image in Adobe Photoshop. From your arsenal of tools, choose the Lasso Tool to start. This tool is ideal for making free-form selections around the hair, a crucial step for targeting the specific area you want to modify. Its precision lays the groundwork for an accurate and impactful alteration using the generative AI capabilities of Photoshop.
Step 2: Select the Object
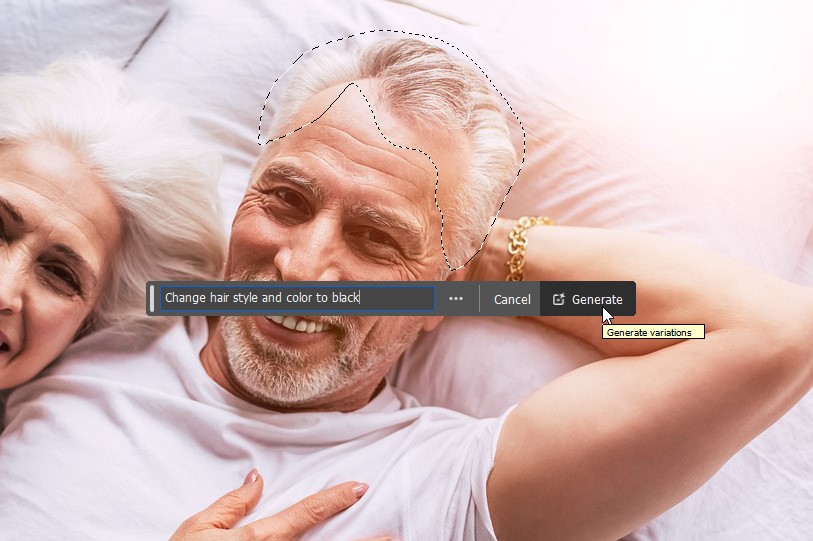
With the Lasso Tool activated, meticulously encircle the hair area you intend to change. This action precisely isolates the hair, making it clear to the AI what aspect of the photo needs modification. Accurate object selection is paramount as it guides the Photoshop AI generative fill feature in understanding your request, thanks to the intelligent algorithms of Adobe Sensei.
Step 3: Enter Your Prompt in Generative Fill

After isolating the hair, head to the “Edit” menu and choose “Generative Fill.” In the ensuing dialogue box, articulate your creative command by entering a prompt like “change hair color to black.” This step is where the magic of AI generative fill shines, utilizing advanced AI photo editing tools to interpret and action your creative direction. Through Adobe’s sophisticated AI feature, your command sets the stage for a photo-realistic transformation.
Step 4: Review Variations and Select the Most Suitable
By clicking the “Generate Fill” button, Adobe Photoshop AI utilizes its generative AI to conjure multiple interpretations of your request. These options are displayed in the generative layer, each offering a different vision of how the black hair might look. This phase demonstrates the prowess of Photoshop’s AI generative fill, enhancing the creative process with AI technology. Explore these variations, leveraging the generative fill feature to pinpoint the rendition that best fulfills your vision, thus marrying the art of image editing with the innovation of AI in Adobe Photoshop.
By following these steps, users not only achieve their desired visual outcome but also unlock a deeper understanding of how to use the generative fill tool in Photoshop, furthering their skills in AI photo editing and graphic design within the Adobe Creative Cloud ecosystem.
Generative Fill Objects
Creating an entire scene with Photoshop’s Generative Fill feature can transform a bland photograph into a dynamic story, complete with iconic figures like King Kong, a looming T-Rex, hovering helicopters, and awe-struck spectators. This capability showcases the depth of AI photo editing tools available in Adobe Photoshop. Follow these steps to inject life into your images through the wonders of AI generative fill:
Step 1: Summon King Kong with the Lasso Tool
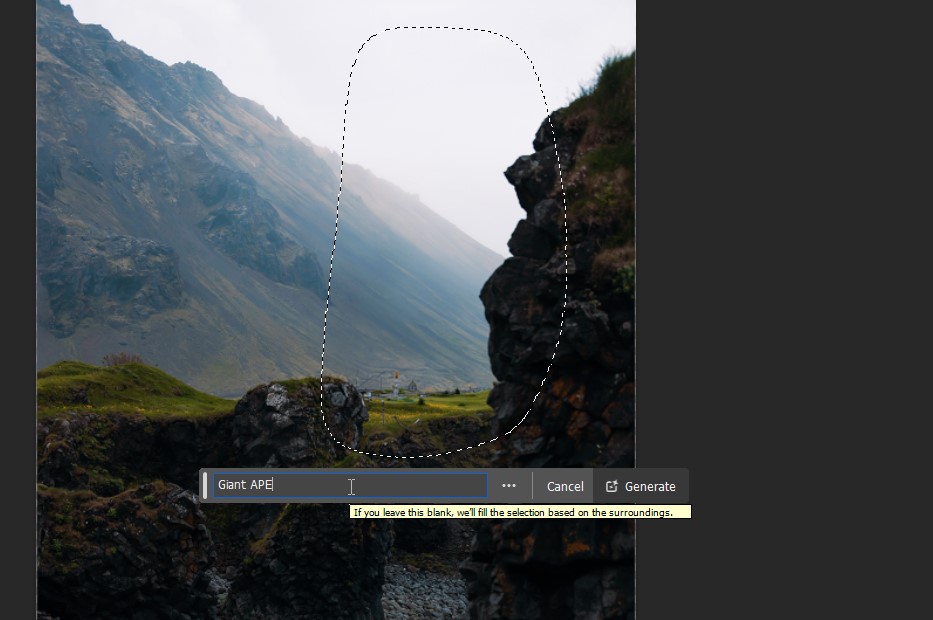
Begin by wielding the Lasso Tool to encircle the area of your photo where you want King Kong to make his grand appearance. With your area selected, head to the “Edit” menu, choose “Generative Fill,” and type in “giant ape” as your prompt. This usage of AI in Photoshop taps into the generative AI features, leveraging Adobe Sensei to interpret your creative command and virtually sculpt King Kong into the scene.
Step 2: Choose the Perfect King Kong

After hitting the “Click Generate” button, Photoshop AI generative fill works behind the scenes, producing several renditions of King Kong in the designated area. This is where the magic of Photoshop’s generative AI shines, offering you different artistic visions of your gargantuan guest. Review these options in the generative layer and select the variant that best captures the awe-inspiring presence of King Kong.
Step 3: Add a Helicopter
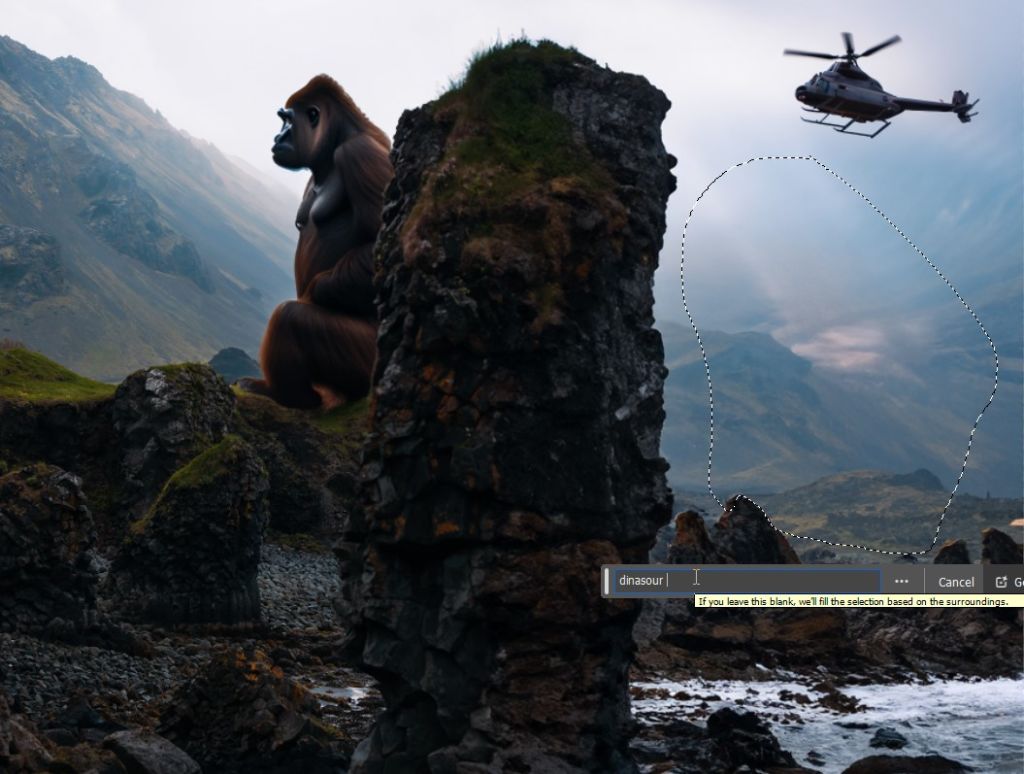
For the next dramatic addition, select a part of the sky in your image where a helicopter would realistically fly. This could involve the Rectangular Marquee Tool or Lasso Tool for precision. In the “Generative Fill” prompt, specify your wish to add a “helicopter” into the scene. The ability to use generative fill in Photoshop allows the AI to accurately splice a helicopter into your sky, enhancing the narrative tension of your photo.
Step 4: Incorporate a T-Rex

No epic scene is complete without a T-Rex. With the Lasso Tool, mark the territory for this prehistoric titan. In the “Generative Fill” prompt, command the addition of a “T-Rex.” This step demonstrates the power of Photoshop AI and its generative fill tool, effortlessly weaving a dinosaur into your unfolding epic.
Step 5: Populate Your Scene

To give your scene a finishing touch, consider adding bystanders to react to this fantastical event. Select the ground area where you envision your spectators, and in the generative fill prompt, ask for “people watching.” This not only adds depth and realism to your image but also showcases the comprehensive capabilities of AI photo editing within Adobe Photoshop.
Frequently Asked Questions
Can I use generative fill with any image?
Yes, you can use generative fill with any image that has clear objects and areas to target for modification.
Does generative fill only work for changing hair color?
No, generative fill can be used for a variety of creative prompts such as adding or removing objects, changing backgrounds, and more.
Do I need advanced technical skills to use generative fill?
No, generative fill is designed to be user-friendly and intuitive. However, some experience with Photoshop tools and features may enhance your editing process.
Can I undo a generative fill action?
Yes, you can undo any changes made with generative fill by using the “History” panel or pressing “Ctrl + Z” on a PC or “Cmd + Z” on a Mac. However, once you save and close the image, these changes will become permanent.
How is Adobe Sensei involved in generative fill?
Adobe Sensei is an AI technology developed by Adobe that powers the generative fill feature in Photoshop. It interprets your creative commands and uses advanced algorithms to generate variations that best fulfill your vision. Overall, it enhances the editing process with AI technology.
Conclusion
In conclusion, mastering how to use AI in Photoshop opens up a realm of creative possibilities, making it an essential skill for modern graphic design. With the generative fill tool, Adobe Photoshop AI transforms the way we think about image editing, allowing users to effortlessly modify and enhance existing images.
From adding dramatic elements with the click generate feature to refining details with the object selection or crop tool, these advancements highlight the significant strides Adobe has made in integrating artificial intelligence into their software.
The generative fill feature, especially when used in conjunction with Photoshop’s beta app and neural filters, exemplifies the power of AI photo editing. By accessing generative fill in Adobe Creative Cloud, graphic designers and photo editors can push the boundaries of creativity, making use of AI generative features to bring their visions to life.
Adobe Sensei, the brain behind these AI tools, continues to revolutionize the way we interact with digital canvases, ensuring that every creative project can achieve its maximum potential.
Whether it’s through the generative layer or the generative fill button, Adobe Photoshop’s AI capabilities are making sophisticated photo editing more accessible and intuitive.
Frequently Asked Questions

Written by
Mike Huddlesman
Meet Mike Huddlesman, the brilliant mind behind CopyRocket AI. As the founder of this innovative company, Mike brings a wealth of experience in machine learning, PHP, and Next JS to the table. With h
View all postsYour AI Marketing Agents
Are Ready to Work
Stop spending hours on copywriting. Let AI craft high-converting ads, emails, blog posts & social media content in seconds.
Start Creating for FreeNo credit card required. 50+ AI tools included.
Related Articles
 General
NotebookLM For Coders: Turn Docs Into Faster Code
Code work often fails for a simple reason. You do not have the right context at the right time. You read docs in one tab, skim tickets in another tab, and then...
 General
How to Optimize for AI Search in 2026: The Complete Guide
AI search has shifted from experimental feature to primary search method for millions of users. ChatGPT Search, Google AI Overviews, Perplexity, Claude, and Gem...
 General
Claude Opus 4.6 Review: Here's What New!
Claude Opus 4.6 from Anthropic draws attention because teams want an AI model that writes better code, follows instructions, and stays consistent across long se...

